
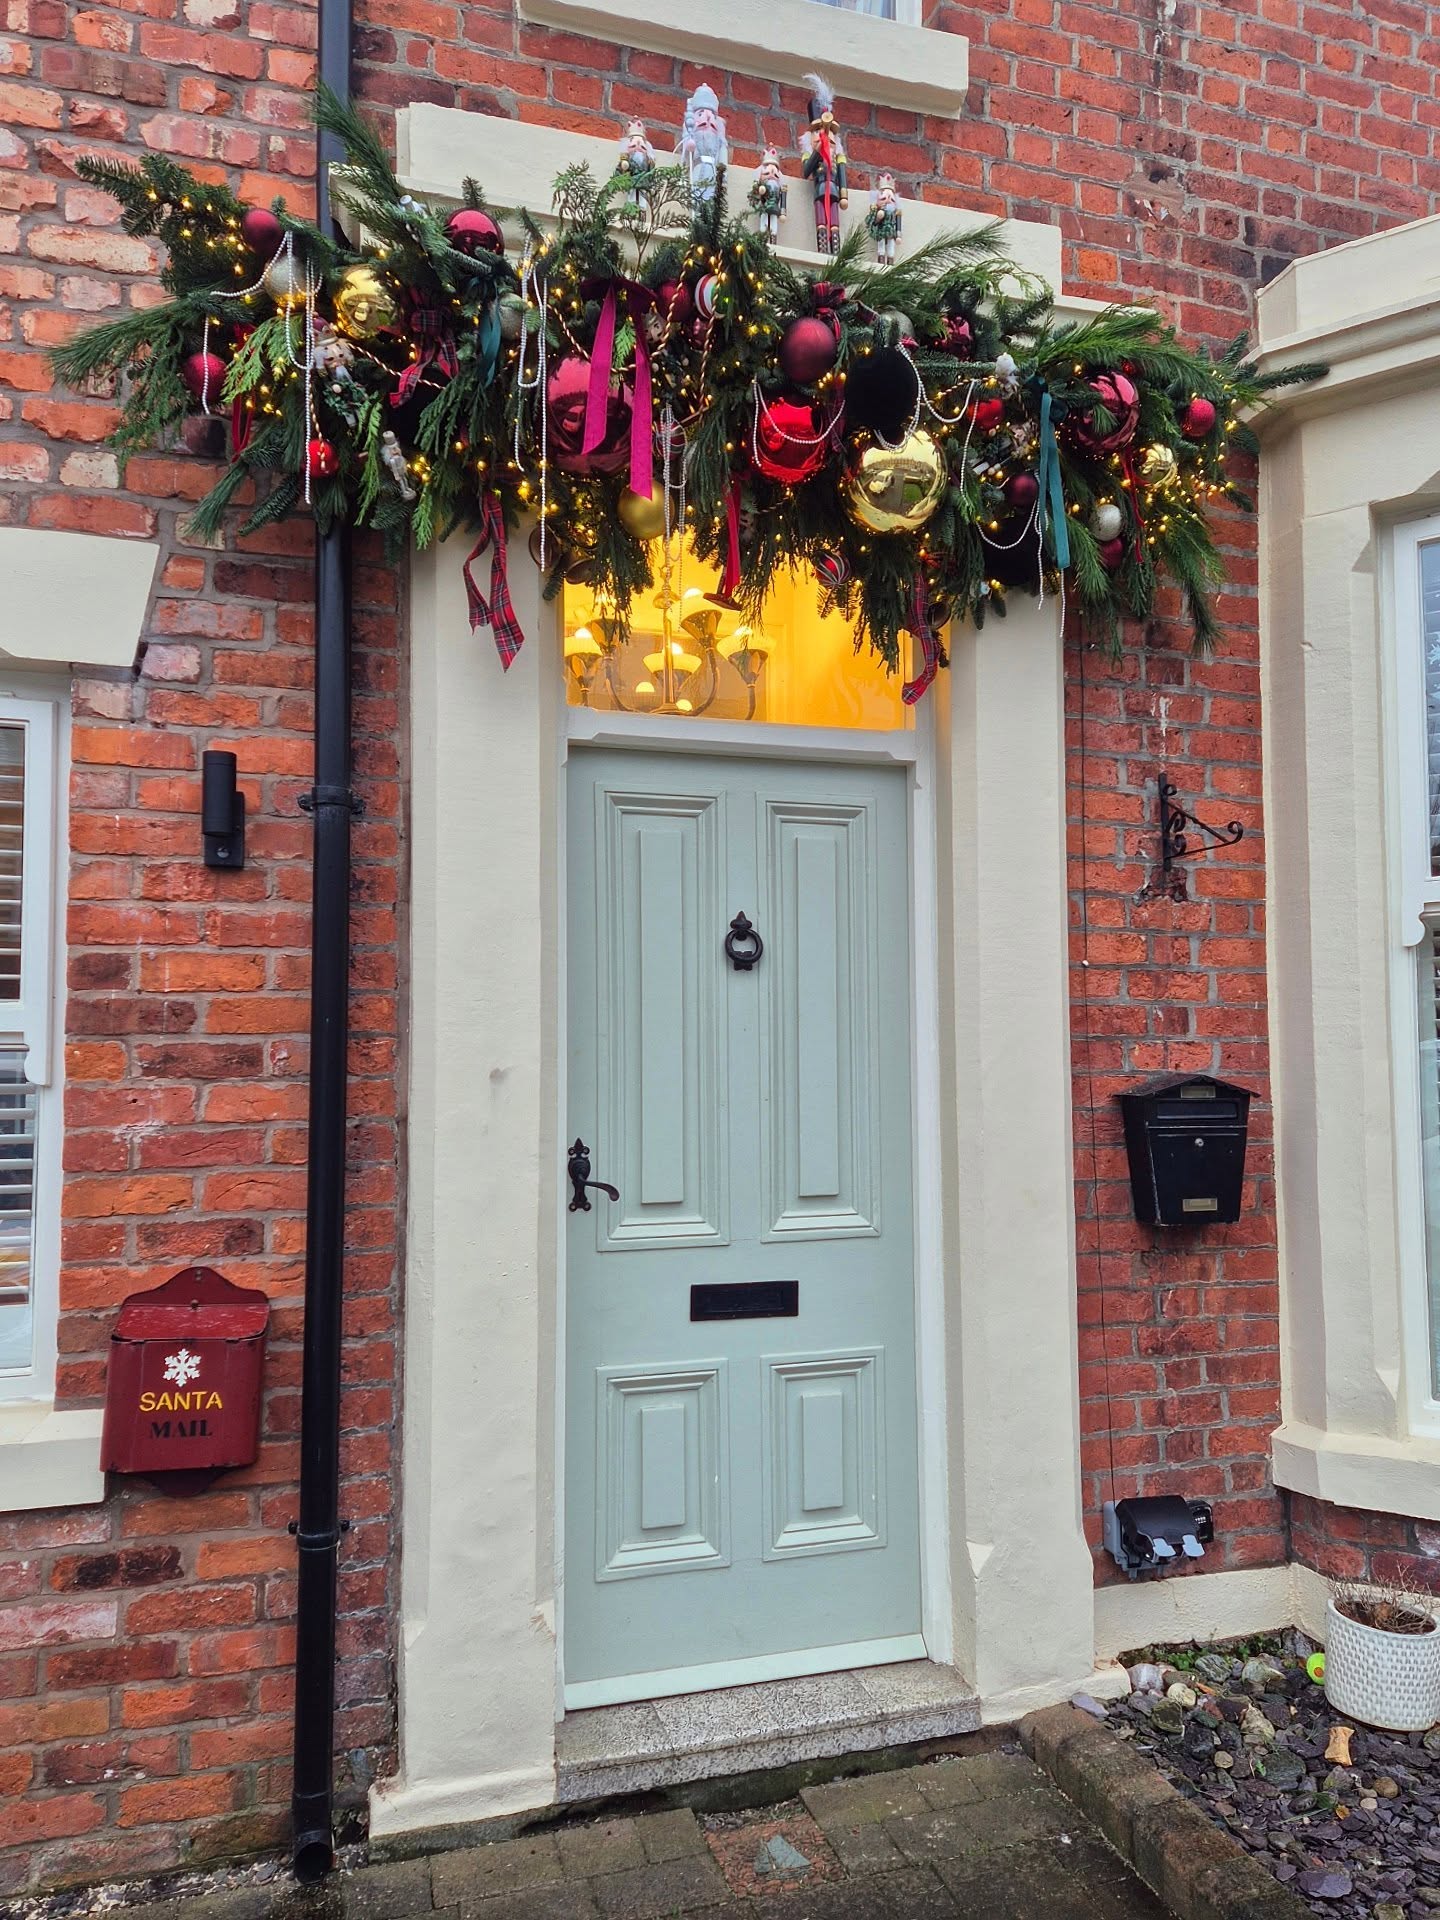
Welcome to my guide.
Your front door is the first thing people see when they visit your home, so it is worth decorating it well for Christmas.
I know it can be hard to choose the right Christmas decorations when there are so many ideas online.
That is why I wrote this guide.
Before writing this guide, I spent a lot of time exploring hundreds of ideas and picked the ones that I think actually work.
I only included ideas that you can try on your own and that work well in real homes.
So, if you are looking for Christmas front door decor ideas, this guide is for you.
Let’s get into the ideas.
1. Snowy Elegance Entrance
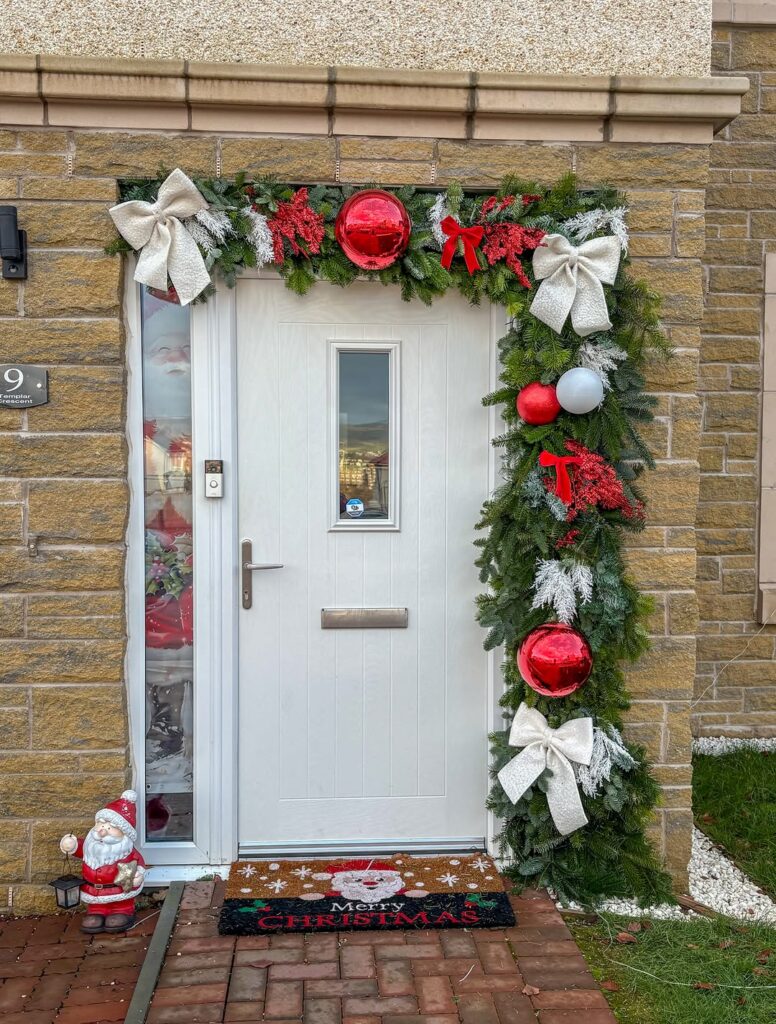
Materials Needed
-
1 heavy-duty artificial pine garland
-
White/snowy floral sprays or picks
-
Large cream fabric bows
-
Oversized and medium shiny red baubles
-
Red berry stems
-
Cable ties/zip ties and removable outdoor hooks (like Command hooks)
Step-by-Step Instructions
Hang the Arch: Start by placing outdoor hooks around your door frame, especially along the top and right side.
Then secure the pine garland with cable ties so everything stays nicely in place.
Add the Snowy Base: Now tuck the snowy white floral picks into the pine branches.
Let a few pieces peek through here and there because that gives the greenery a soft, frosted look.
Layer the Red Elements: This is where you can have a little fun with the color.
Place the large red baubles around the garland, focusing on the top center, upper right, and lower right areas. Tuck in a few red berry stems as well to make everything feel fuller.
Attach the Bows: To finish the look, add the large cream bows to the upper corners and lower right side.
They soften the bold red accents and bring the whole Christmas entrance together beautifully.
2. Oversized Velvet Bow Grand Entrance
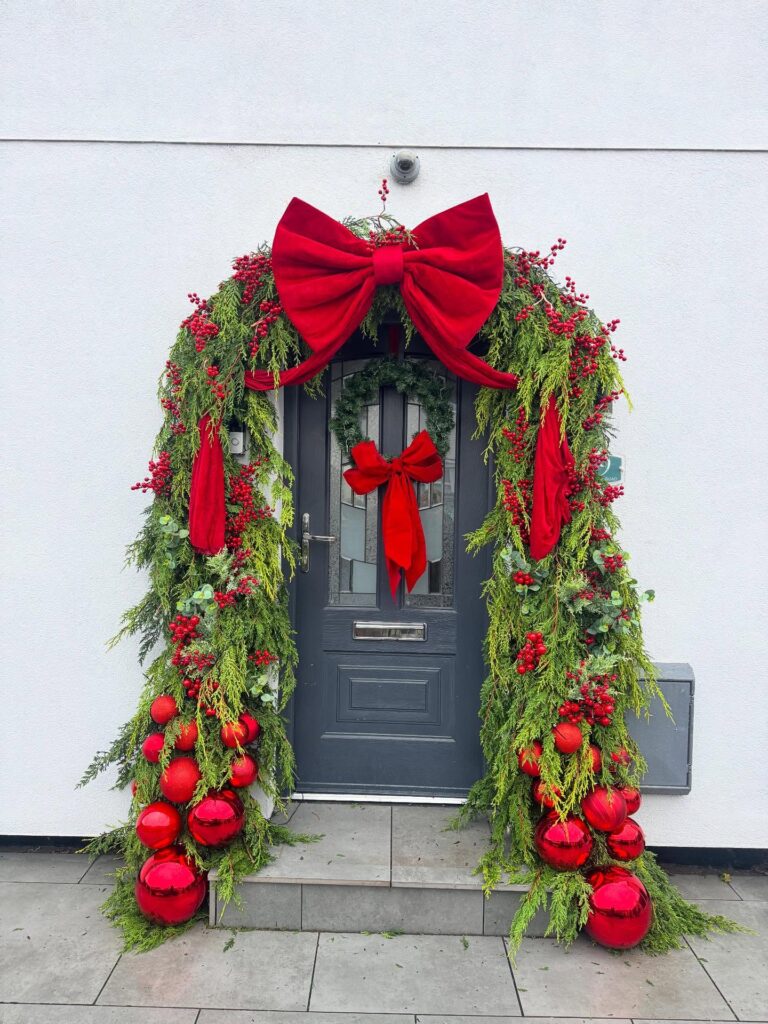
Materials Needed
-
Extra-thick cedar/pine garland
-
1 extra-large red velvet bow (for top)
-
1 medium red velvet bow (for wreath)
-
Matching pine wreath
-
Red berry branches and green eucalyptus picks
-
Assorted large red ornaments
Step-by-Step Instructions
Mount the Garland Frame: Get the thick garland wrapped securely around your door frame. Let the ends drape onto the ground slightly for a relaxed and fuller Christmas look.
Anchor the Top Bow: Place the oversized red velvet bow right at the highest point of the frame. Give the loops a little fluff so they look soft and full.
Pile the Ornaments at the Base: Bring the large red ornaments together near the bottom of both sides. Secure them with floral wire so they stay exactly where you place them.
Fill with Berries and Hang the Wreath: Tuck red berry picks and eucalyptus branches into the open spots. Then hang the pine wreath on the door and add its matching bow.
3. Wrapped Present Doorway Arch
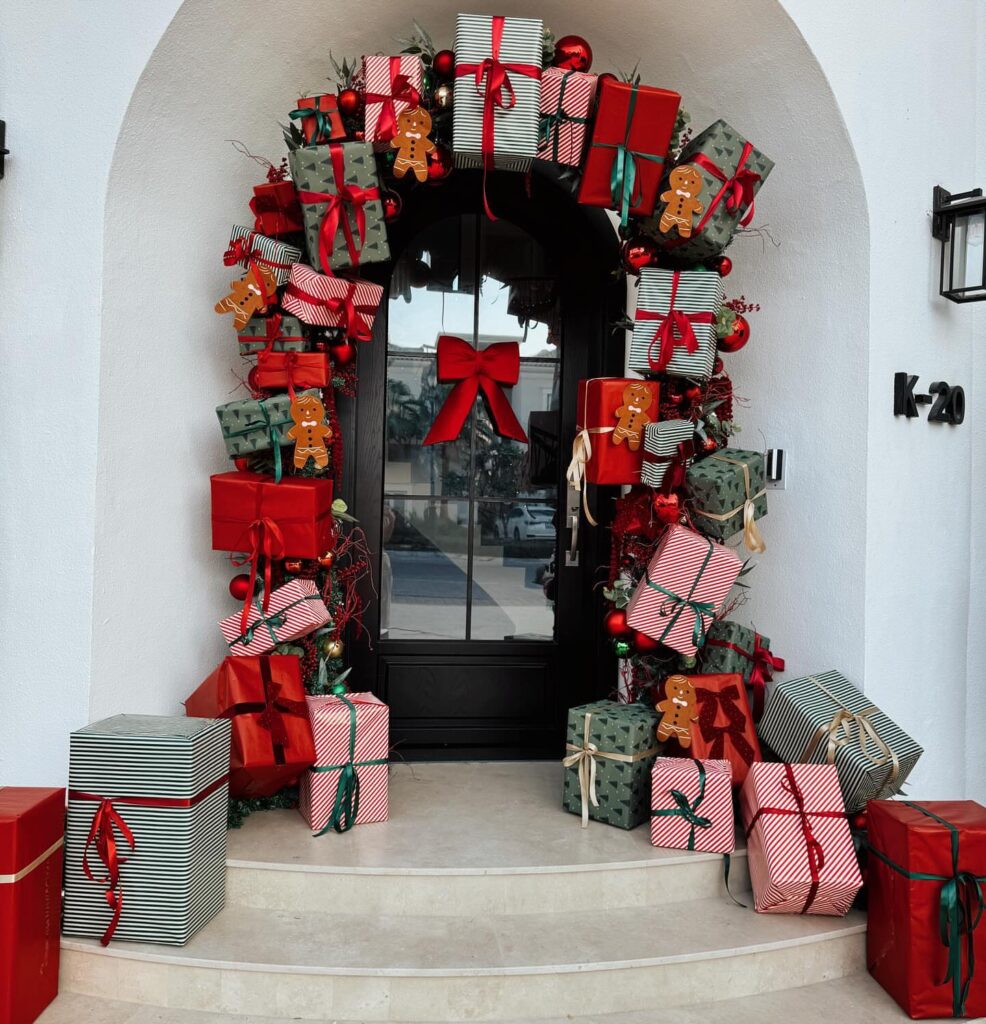
Materials Needed
-
Empty cardboard boxes (various sizes)
-
Waterproof/weather-resistant wrapping paper (green, red, striped)
-
Weatherproof ribbon
-
Gingerbread man foam/cardboard cutouts
-
Outdoor Command strips or floral wire
Step-by-Step Instructions
Wrap the “Gifts”: Believe it or not, empty boxes can turn into some really fun Christmas decor.
Wrap them in your favorite holiday paper, add pretty ribbons, and make sure they are protected if your porch gets wet.
Build the Arch: Now comes the exciting part. Arrange the wrapped boxes around your door trim and secure them well with strong mounting tape, zip ties, or a thin wire frame.
Add Gingerbread Accents: You know, a few little gingerbread details can make the whole display feel much more playful.
Attach the cutouts to different boxes and spread them around so everything feels natural.
Finish the Porch: For the bottom, place the remaining wrapped boxes on both sides of your doorway.
Mix up the sizes because, honestly, a little variety makes the whole setup feel more like a real pile of Christmas presents.
 Also check out 27 Christmas Mantel Decorating Ideas for a Festive Home.
4. Vintage Pastel & Silver Archway
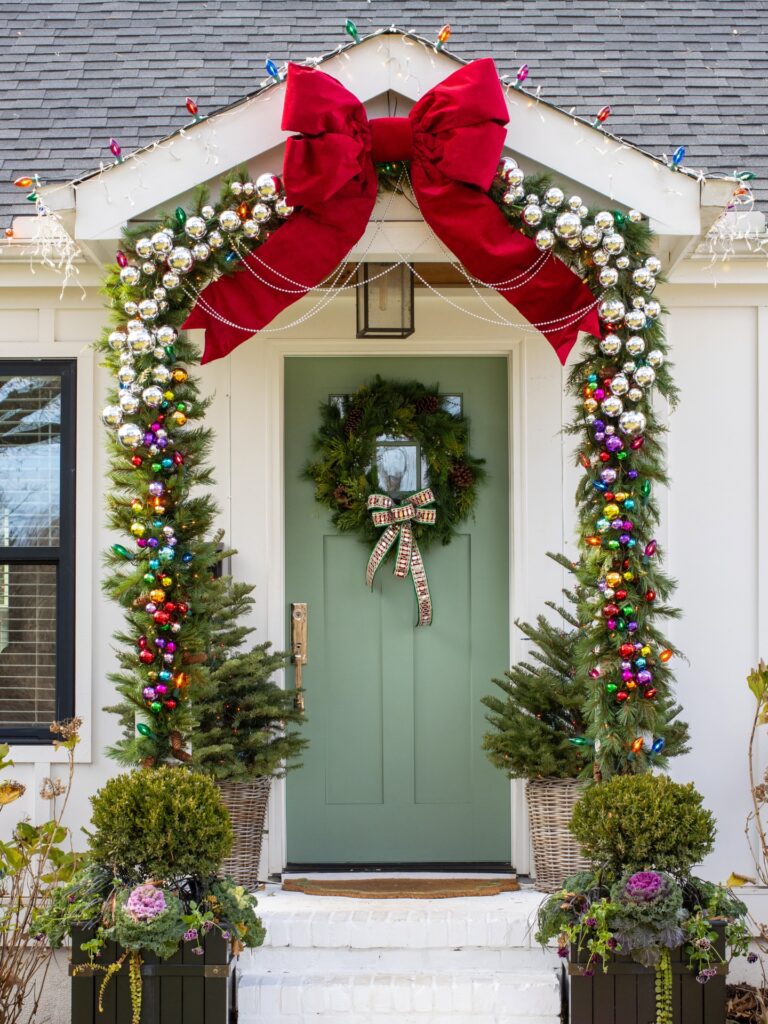
Materials Needed
-
Dense pine garland
-
Shatterproof silver baubles (various sizes)
-
Vintage-style multi-color bulb string lights
-
1 extra-large red top bow
-
Bead garland/strands
-
Two potted porch greens
Step-by-Step Instructions
Light the Garland: Before hanging everything up, wrap the pine garland with those colorful vintage-style bulb lights.
Honestly, seeing the little bulbs glow through the greenery is one of my favorite parts.
Hang the Garland: Now carefully place the garland around your doorway and secure it well.
Make sure everything feels sturdy before moving on to the fun decorating.
Pack with Silver Baubles: Add plenty of shatterproof silver ornaments along the garland, keeping them close together for that rich, sparkling look.
You can mix the sizes a bit so it feels more natural.
Add Drape and Accents: Next, gently drape silver bead strands across the top and add the large red bow right at the peak.
Finish with two green plants in woven baskets beside the steps for a warm, finished entrance.
5. Candy Cane & Colorful Ornament Explosion
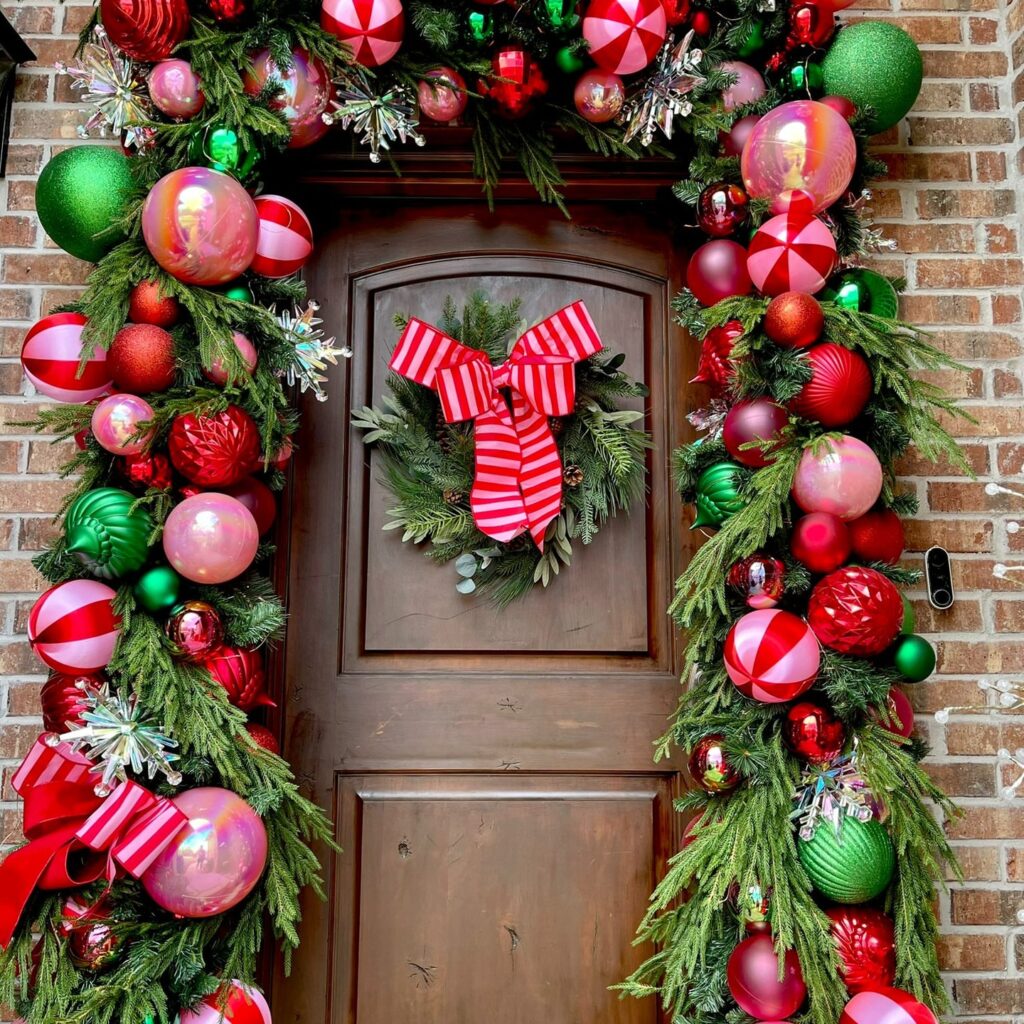
Materials Needed
-
Full evergreen garland & matching wreath
-
Pink, green, red, and striped ornament balls (assorted sizes)
-
Striped ribbon (candy cane style)
-
Metallic starburst ornaments
Step-by-Step Instructions
Prep the Wreath: Let’s start with the evergreen wreath and give it a fun little upgrade.
Tie on that large striped bow, then hang the wreath right in the center of your door.
Arrange Large Baubles: Now bring out your biggest pink, lime green, and red ornaments.
Place them around the garland with a bit of space so the colors do not feel crowded.
Fill the Gaps: Once the big pieces are in place, you can start playing with the smaller ones.
Mix the candy-striped ornaments with the medium and tiny baubles until everything feels nicely filled.
Add Sparkle: Finally, tuck those metallic starburst picks into the greenery wherever you see an empty spot.
Honestly, these little shiny details are what make the whole entrance feel extra festive.
6. Tulle Ribbon Wrap Doorway
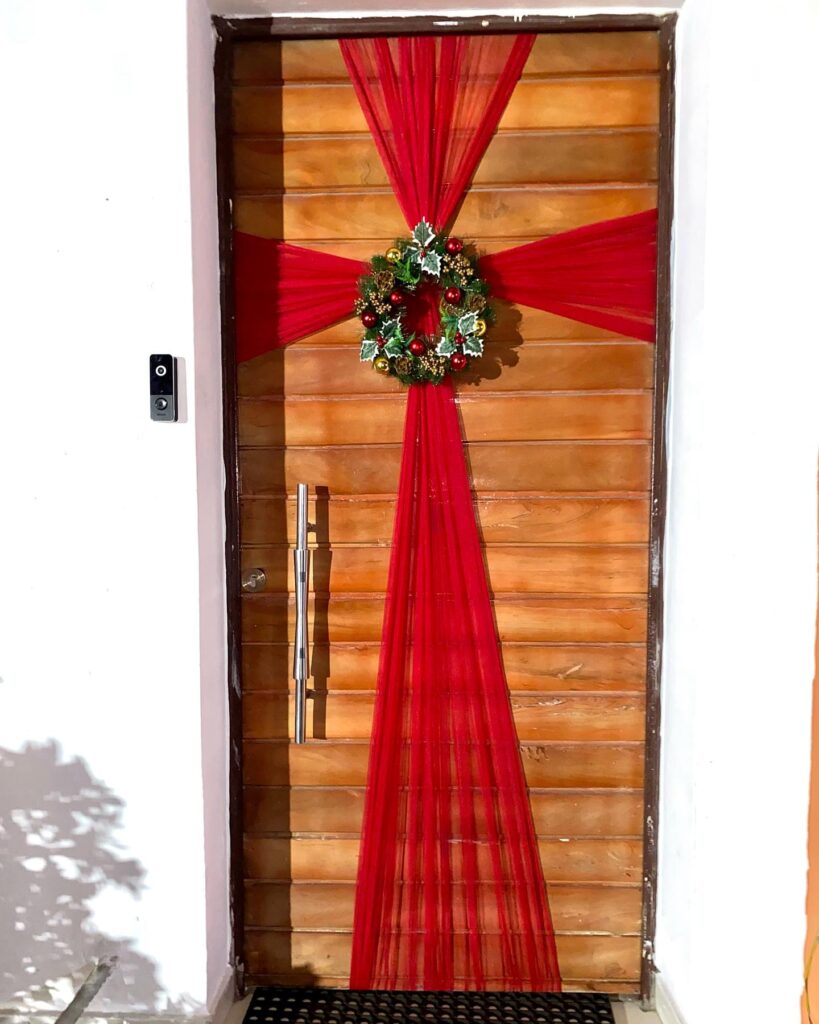
Materials Needed
-
Wide red tulle fabric (12–18 inches wide, several yards long)
-
Small berry and pinecone wreath
-
Heavy-duty double-sided tape or door hooks
Step-by-Step Instructions
Wrap Vertically: Take your long red tulle and run it down the center of the door, almost like you are wrapping a giant Christmas gift.
Secure both ends behind the door with tape or hooks.
Wrap Horizontally: Add another piece across the middle, letting it cross neatly over the first strip.
Make sure the fabric sits flat so the design looks clean.
Hang the Wreath: Place the berry wreath right where the two tulle pieces meet.
This little detail hides the crossing point and gives your door a beautiful focal spot.
Fan Out the Tulle: Now gently pull and spread the tulle around the wreath.
A little fluffing goes a long way, giving the fabric that soft and pretty bow effect.
7. Warm Illuminated Berry Archway
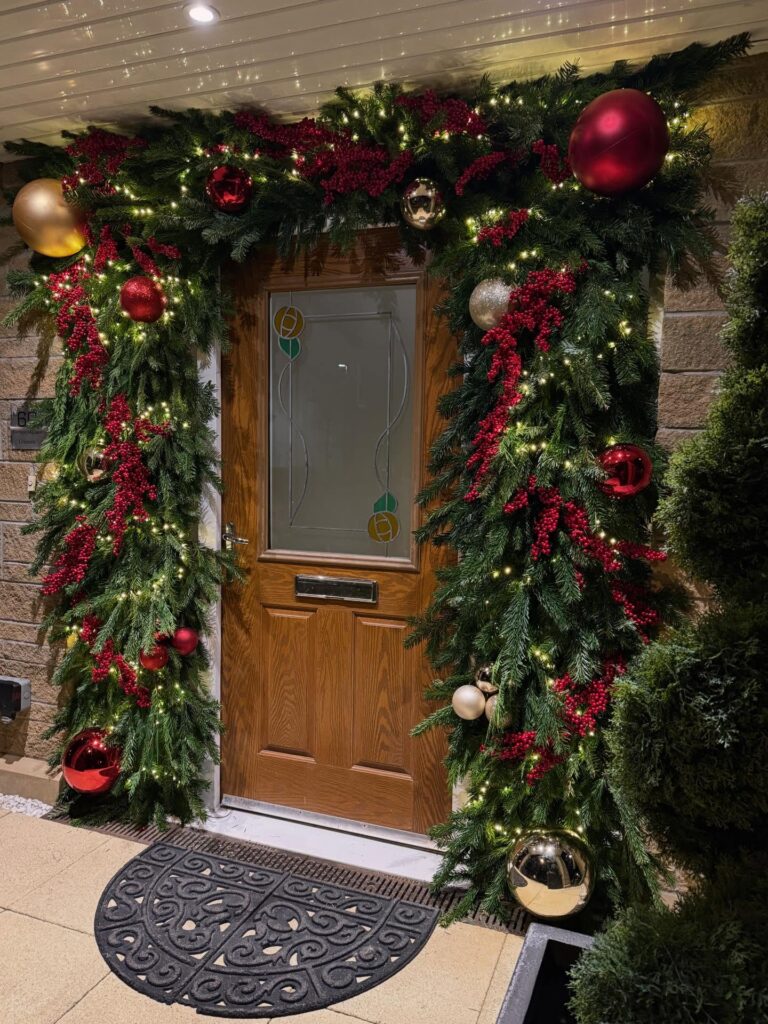
Materials Needed
-
Extra-bushy pine garland
-
Warm white LED string lights (outdoor rated)
-
Heavy red berry garlands/picks
-
Large shiny red and gold baubles
-
Half-moon outdoor mat
Step-by-Step Instructions
Weave Lights Tightly: Before hanging the garland, tuck the warm white LED lights deep into the pine branches.
This helps the glow spread softly instead of sitting only on the surface.
Hang & Frame: Once the lights are ready, place the garland over the top of your doorway and bring it down both sides. Secure everything well so it stays put.
Add Rich Red Berries: Now bring in the red berry garland and weave it through the pine.
Let a few longer pieces hang down naturally for a fuller, more relaxed look.
Add Reflective Baubles: Finally, nest deep red and shiny gold baubles between the branches.
When the evening lights come on, those little reflective details catch the glow beautifully.
Also check out our must-see guide on 23 Beautiful Christmas Front Porch Ideas That Suit Every Home.
8. Asymmetrical Side-Swoop Garland
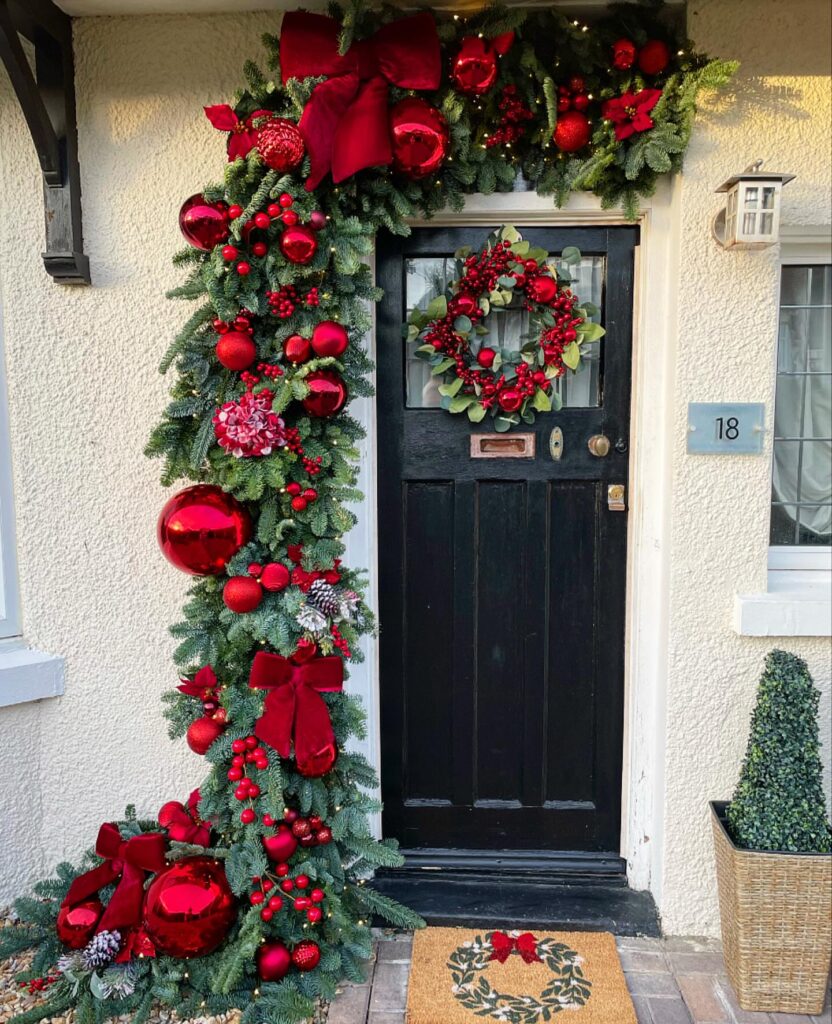
Materials Needed
-
1 long flexible pine garland
-
Matching pine wreath
-
Deep red velvet bows (1 medium, 1 small)
-
Red baubles, pinecones, and poinsettia picks
Step-by-Step Instructions
Mount Asymmetrically: Start the garland from the bottom left and work it straight up the side of the doorway.
Let it continue halfway across the top for that relaxed, asymmetrical look.
Form the Pool: Once the garland reaches the ground, let the extra greenery spill outward onto the porch floor.
Honestly, a little messiness here makes the display feel much more natural.
Decorate the Cascade: Now add red velvet bows, shiny red baubles, pinecones, and poinsettias along the left side.
Keep the larger ornaments closer to the bottom.
Balance the Door: Hang a simple berry-and-pinecone wreath in the center of your door.
This gives the empty right side some balance without taking attention away from the dramatic garland.
9. Life-Sized Gingerbread Porch
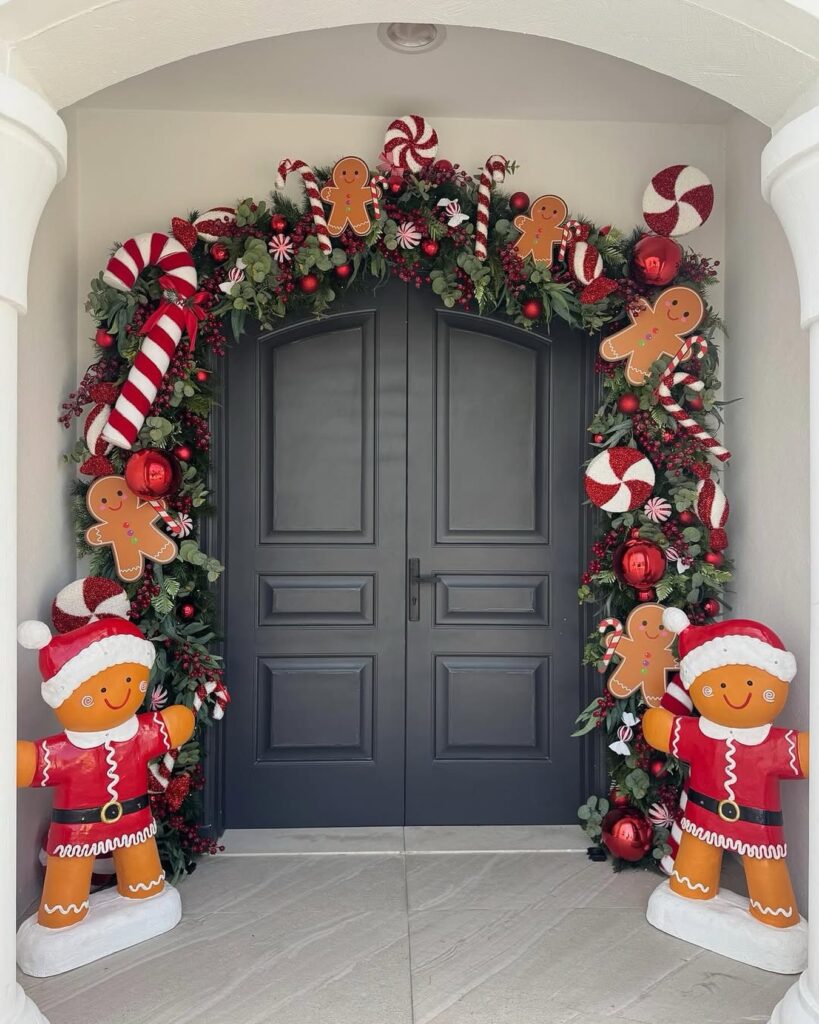
Materials Needed
-
Full evergreen garland
-
2 large standee gingerbread figures (foam board or plastic)
-
Large faux candy canes & peppermint swirl picks
-
Eucalyptus branches and red berry stems
-
Large red ornaments
Step-by-Step Instructions
Install the Archway: Get the full green garland secured around your doorway, covering the top and both sides.
Let the greenery stay a little full because that helps create the candy-shop feel.
Integrate the Candies: Now add oversized peppermint swirls, giant candy canes, and eucalyptus stems throughout the garland, spreading them around instead of grouping everything together.
Flank the Doorway: Place one life-sized gingerbread figure on each side of the entrance.
Their big smiles and bright details will make the doorway feel like something straight out of a Christmas story.
Secure Everything: Before calling it finished, make sure the figures are not going anywhere.
A little wire attached to the garland or wall hooks will keep them steady on windy days.
Also check out 23 Festive Banister Christmas Decor Ideas That Look Amazing.
10. Monochromatic Crimson Bauble Cascade
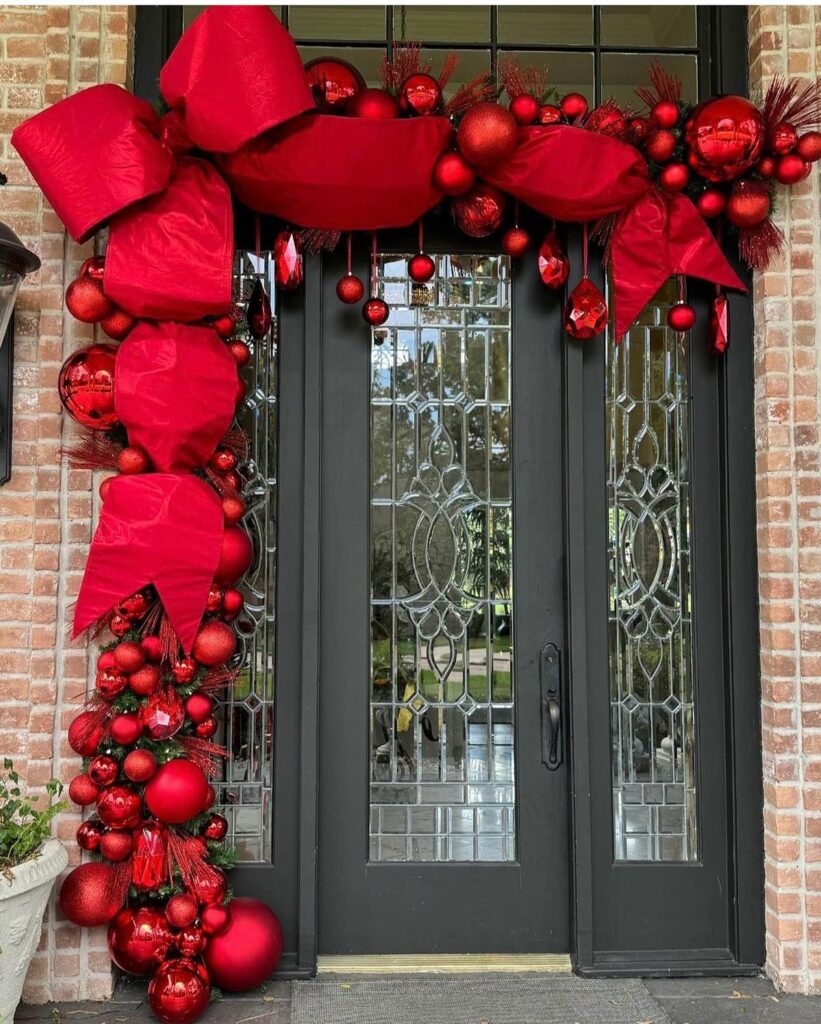
Materials Needed
-
Wide red satin bow ribbon
-
Red baubles (assorted sizes: extra-large, medium, small)
-
Red teardrop ornaments and glitter sprigs
-
Floral wire and Command hooks
Step-by-Step Instructions
Drape the Ribbon Bow: Start by placing that oversized red bow at the top-left corner of your door frame. Let the wide ribbon tails fall across the top and down the side.
Cluster the Baubles: Now bring the red baubles along the left side and keep the larger ones closer to the bottom. Mixing the sizes makes everything feel fuller.
Hang the Teardrops: For a little extra sparkle, hang the crystal-cut red teardrops and small shiny balls across the top.
Let them fall at different lengths so the display does not look too uniform.
Fill with Glitter: Finally, tuck the glittery red branch picks into the gaps.
Honestly, these tiny sparkling details make the whole entrance feel much more festive without going overboard.
11. Glowing Red Velvet & Bauble Arch
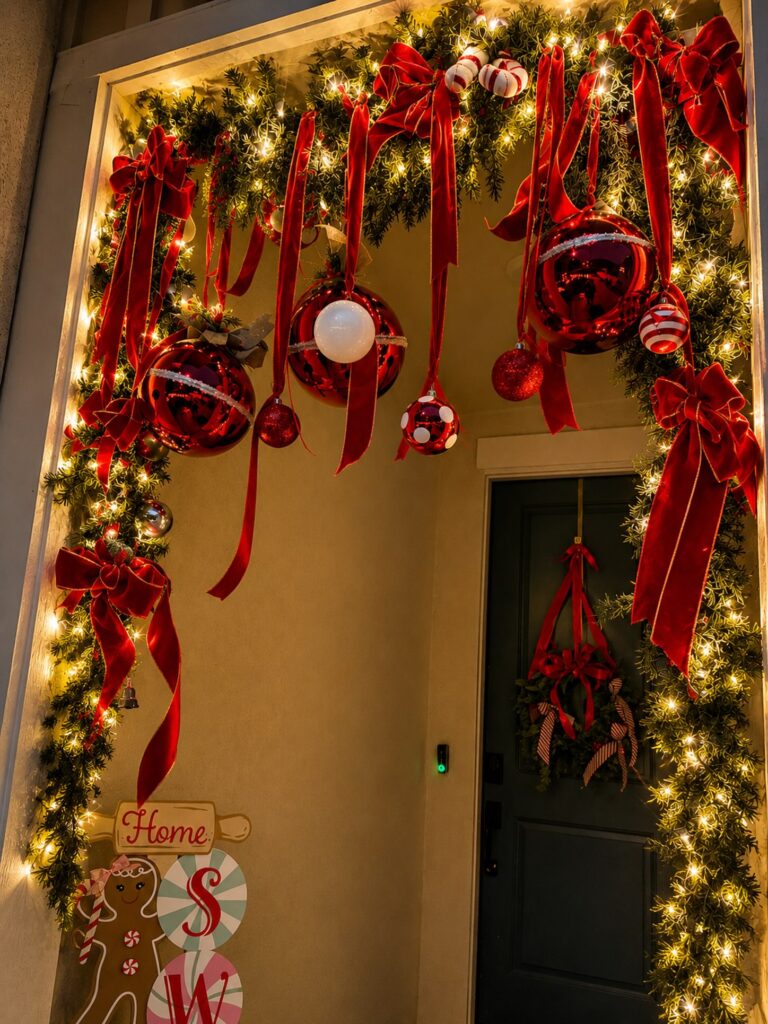
Materials Needed
-
Dense pine arch garland with warm mini lights
-
Extra-large glossy red ornaments
-
Long red velvet ribbon strands
-
Mini candy cane accents
-
Gingerbread porch sign
Step-by-Step Instructions
Hang the Lit Arch: Get the pre-lit pine garland secured around your doorway first.
Once the lights are glowing through the greenery, the whole entrance already starts feeling festive.
Tie the Suspended Ribbon Balls: Now wrap red velvet ribbons around the oversized red ornaments and secure them to the top garland so they hang down like floating Christmas decorations.
Accent with Bows: Add matching red velvet bows along both sides of the garland.
Keep them spaced out so the entrance looks balanced without feeling too decorated.
Set Up the Porch Accents: Finish with a small pine wreath on the door and a wooden gingerbread sign near the bottom left.
Those little touches make the entrance feel extra cheerful.
12. Colorful “Merry & Bright” Paper Light Door
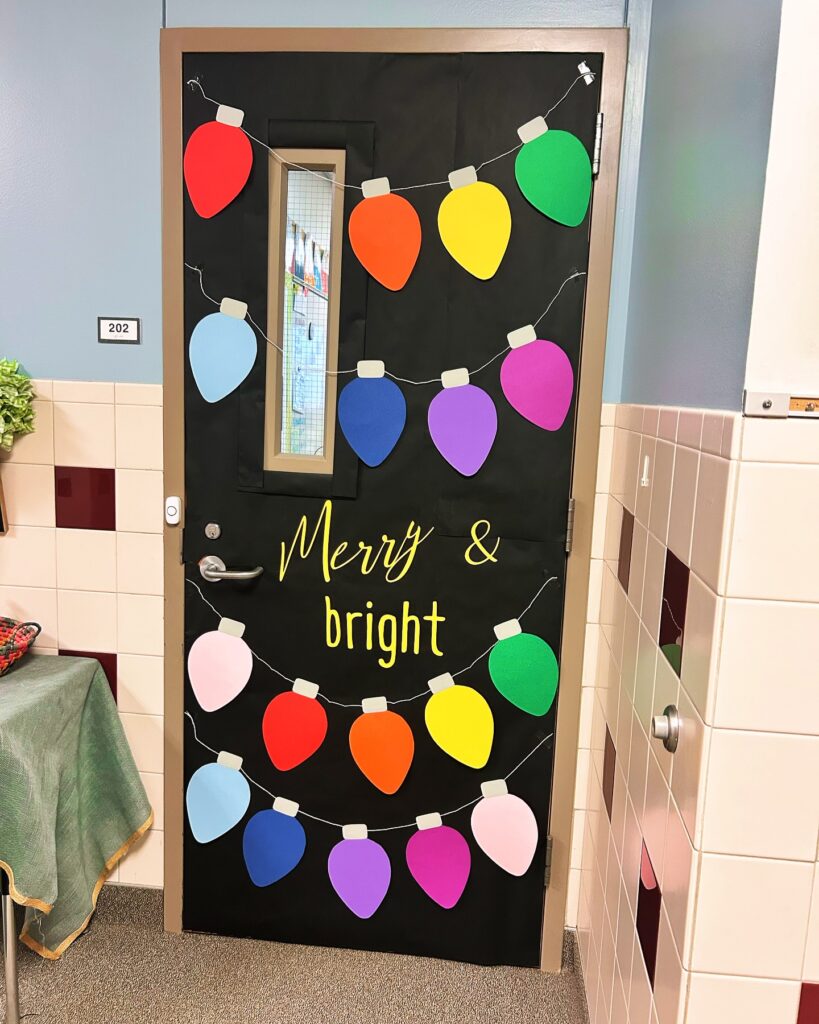
Materials Needed
-
Black door wrap paper (or butcher paper)
-
Colorful craft cardstock (red, yellow, blue, green, purple, pink)
-
White string or thin yarn
-
Yellow vinyl lettering or paint pens
Step-by-Step Instructions
Wrap the Door: Cover the front of your door with black paper, keeping it smooth as you go.
Use painter’s tape around the edges, and cut neat openings around the handle and window.
Cut Out the Bulbs: Grab some colorful cardstock and cut out large Christmas light bulb shapes.
Add small white toppers to each one so they look like real bulbs.
String the Lights: Now tape white string across the door in loose, gentle swags.
Attach your colorful bulbs along the string, spacing them out so the design feels natural.
Add the Message: Finish with a cheerful “Merry & Bright” message right in the center.
Yellow vinyl letters or a metallic paint pen will stand out beautifully against the black background.
13. Elegant Nutcracker & Swag Entryway
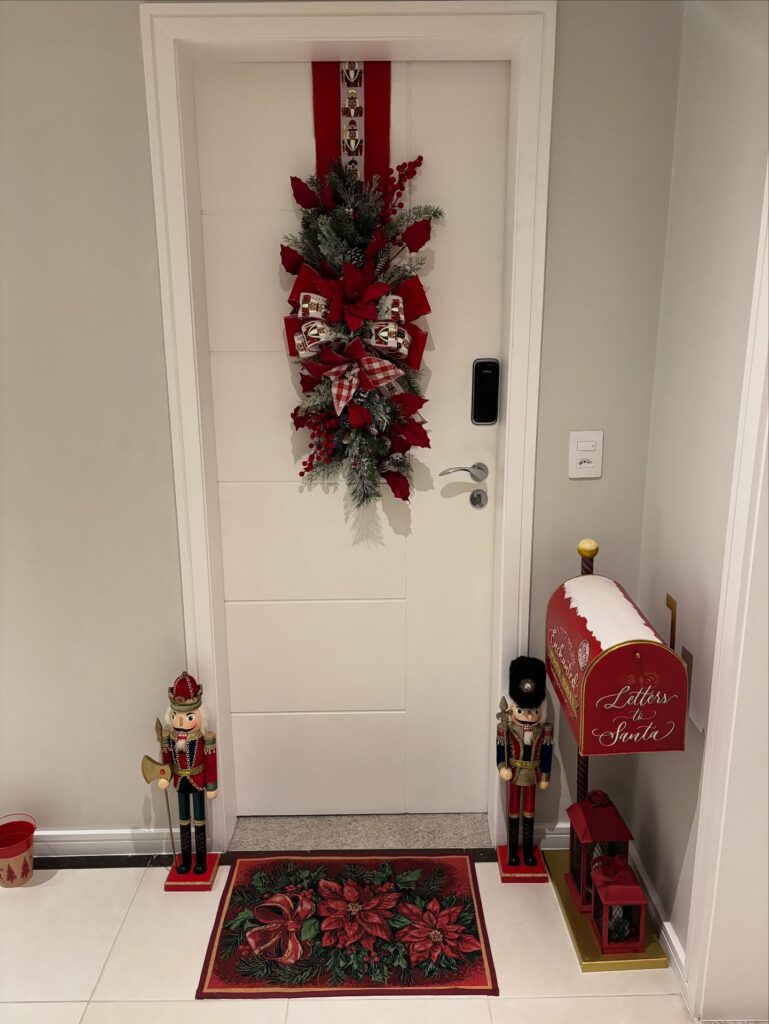
Materials Needed
-
Vertical pine door swag with red poinsettias
-
Plaid red and white accent ribbon
-
2 wooden nutcracker statues
-
1 vintage-style “Letters to Santa” mailbox
-
Poinsettia doormat
Step-by-Step Instructions
Hang Ribbon Strip: A wide red ribbon running down the upper part of the door gives you a great starting point.
Keep it centered and secure it neatly so everything else has a place to sit.
Mount the Swag: Place the teardrop pine swag over the ribbon and let the greenery hang naturally.
The poinsettias, berries, and plaid bows bring in that classic Christmas mix without needing too many extras.
Position the Nutcrackers: Two tall nutcrackers can really frame the doorway.
Set one on each side and adjust their positions until the entrance feels balanced from a distance.
Add the Mailbox Accent: For the finishing touch, bring in a little red “Letters to Santa” mailbox beside the doormat.
I think this is what gives the whole display that playful Christmas-story feeling.
Also check out our most popular guide on 21 Christmas Dining Table Decor Ideas You’ll Want to Try.
14. Whimsical Grinch Archway Entry
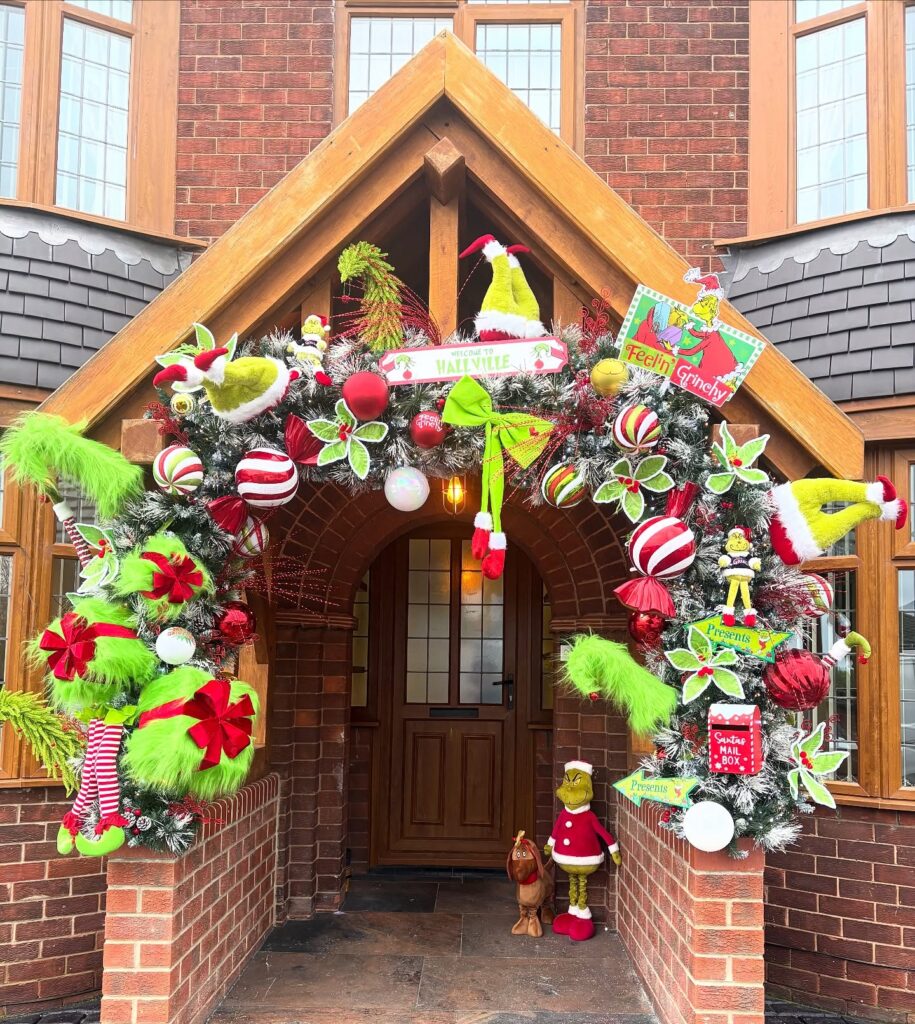
Materials Needed
-
Frosted pine garland arch
-
Grinch plush limbs (legs, arms, head)
-
Lime green bows and striped red ornaments
-
Grinch signs (“Feel’in Grinchy”, “Welcome to Whoville”)
-
Plush Grinch and Max dog figures
Step-by-Step Instructions
Install the Arch: Get that frosted pine garland secured around the porch structure first.
Let the snowy branches stay a little loose and fluffy because that makes the whole setup feel more magical.
Tuck in the Grinch Elements: Here’s where you can really have some fun. Tuck the Grinch’s furry green arms and legs into the garland, then add those funny green gift boxes between the branches.
Add the Festive Signs: A couple of playful signs can really bring the theme together.
Place the “Whoville” and “Feel’in Grinchy” signs near the top so everyone knows exactly what is going on.
Set Up the Characters: Now add the little Grinch plush toys throughout the greenery.
Place the standing Grinch and Max at the bottom, and honestly, that is where the whole scene starts to feel alive.
15. Peppermint Candy & Frosted Pine Arch
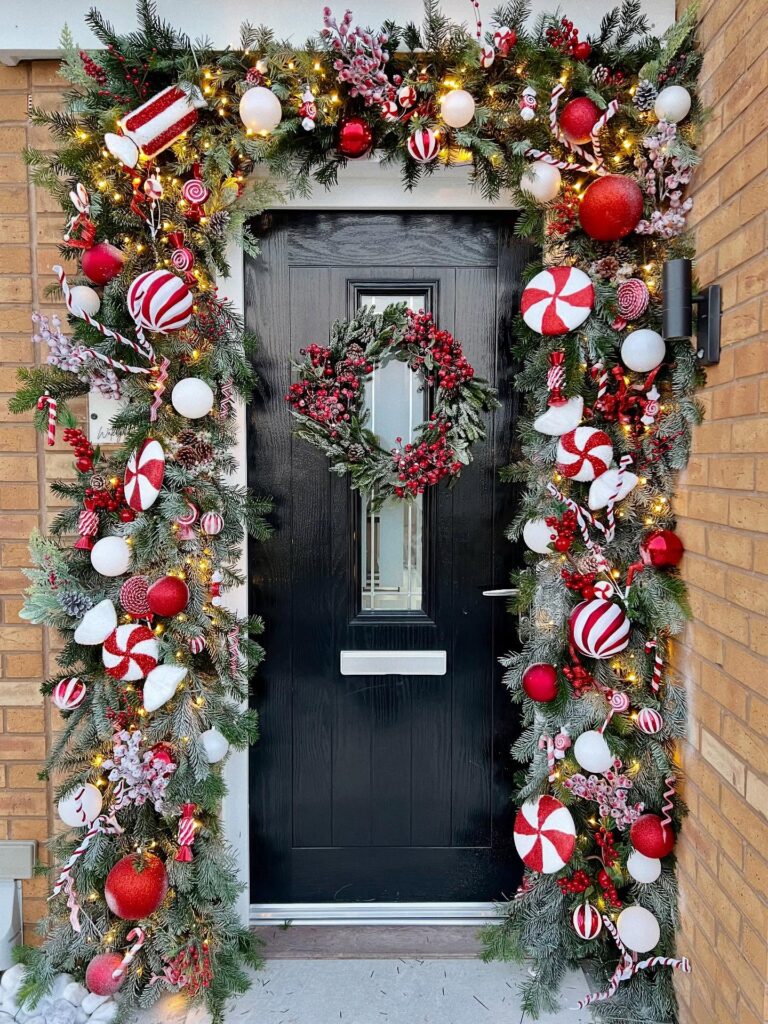
Materials Needed
-
Frosted pine garland and matching frosted wreath
-
Faux peppermint candy swirls and wrapped candy props
-
White and red shatterproof ornaments
-
Red berry stems and warm string lights
Step-by-Step Instructions
Mount the Garland & Wreath: Get the frosted pine garland around your door trim first, then hang the frosted berry wreath on the door.
This already gives the entrance such a pretty wintery base.
Insert the Peppermints: Now tuck the peppermint swirls and wrapped candy pieces along both sides of the garland, leaving enough space between them.
Cluster the Baubles: Bring in the matte white, glossy red, and striped ornaments next.
Mix a few together in small groups because that makes the greenery feel much more interesting.
Fill Out the Texture: Take a look around and find any spots that seem a bit bare.
Add red berry picks and frosted twigs there, and you’ll have a full, cozy Christmas entrance.
If you’re a Christian mom, you must read this guide on 20 December Prayers Every Christian Mom Should Pray.
16. Gingerbread Street Candy Cane Doorway
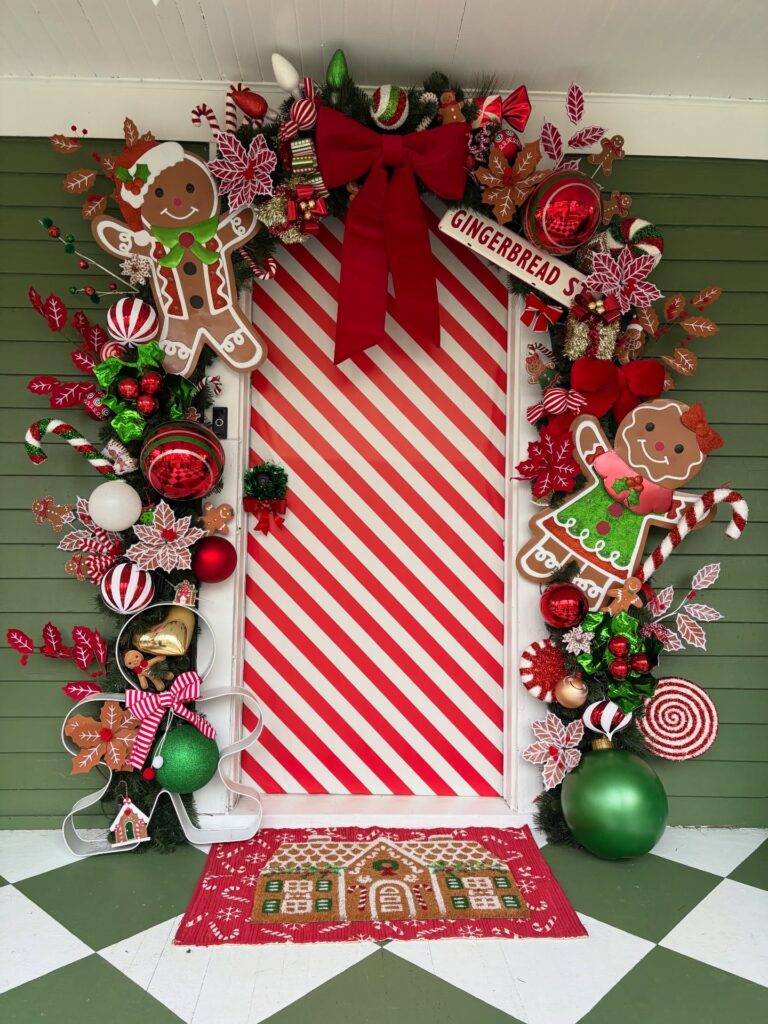
Materials Needed
-
Diagonal red-and-white striped door wrap
-
Large gingerbread man cutouts
-
Giant oversized red velvet bow
-
Giant candy cane and peppermint props
-
Gingerbread house doormat
Step-by-Step Instructions
Wrap the Door: Cover the front door with red and white candy cane striped wrap, smoothing it out as you go.
Honestly, this alone makes the entrance feel like a giant Christmas treat.
Top with the Giant Bow: Place the oversized red bow right at the top center of the frame.
Add the “Gingerbread St.” sign nearby for that extra sweet little detail.
Attach the Gingerbread Cutouts: Now bring in the gingerbread boy and girl cutouts.
Place one on each side of the garland so they look like they are welcoming everyone inside.
Ground with the Props: Finish the bottom with oversized green baubles, peppermint candy discs, and a gingerbread doormat.
I think these colorful pieces make the whole entrance feel playful and full of Christmas charm.
17. DIY Craft Snowman Door Display
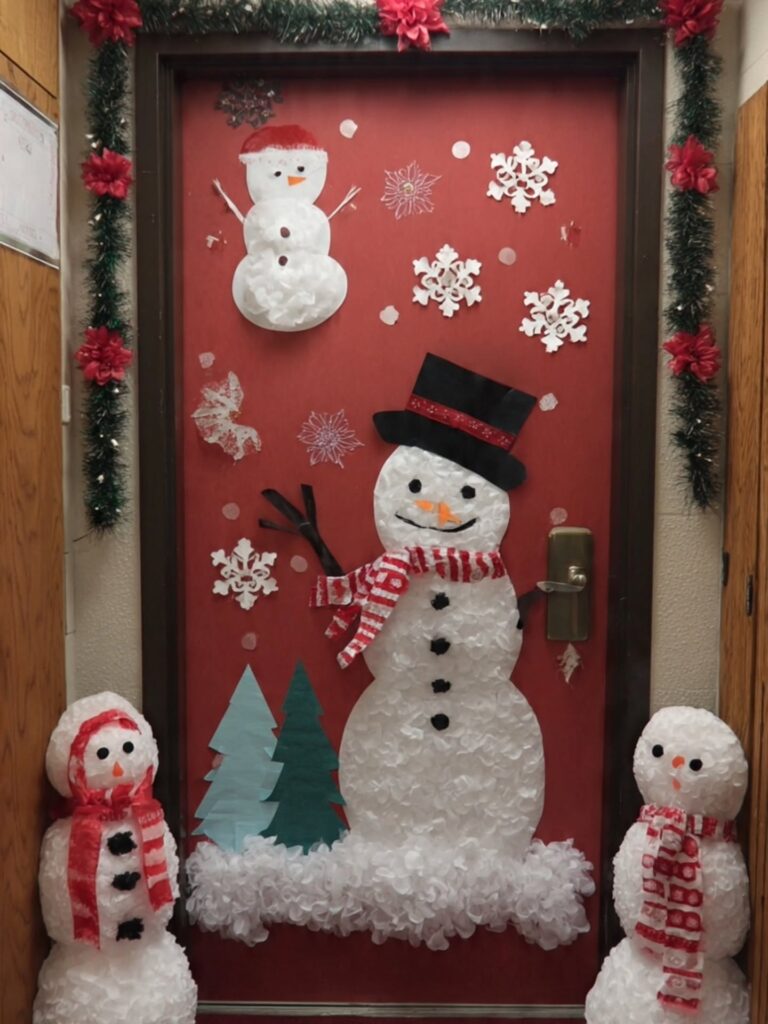
Materials Needed
-
Red door backing paper or paint
-
White coffee filters or tissue paper circles
-
Black construction paper (top hat, eyes, mouth)
-
Orange paper (carrot nose) and fabric scarf
-
Green paper trees
Step-by-Step Instructions
Cover the Background: A bright red door is the perfect starting point for this cute snowman idea. If your door is not red, red butcher paper works just as well.
Build the Snowman Body: Grab your white coffee filters or tissue paper and start scrunching them into fluffy little pieces. Glue them together into three round sections, and do not stress about making them perfectly shaped.
Add the Features: This is the part that really brings your snowman to life.
Now add his black paper top hat, button eyes, and orange carrot nose, then wrap a cozy fabric scarf around him.
Add the Surrounding Details: A few paper snowflakes above the snowman can make the whole door feel like a little winter scene.
Add two 3D tissue paper snowmen beside small paper pine trees for an extra playful touch.
Also check out 14 Bible Lessons Every Christian Mom Should Never Forget.
18. Layered Red & Lime Tulle Cross Wrap
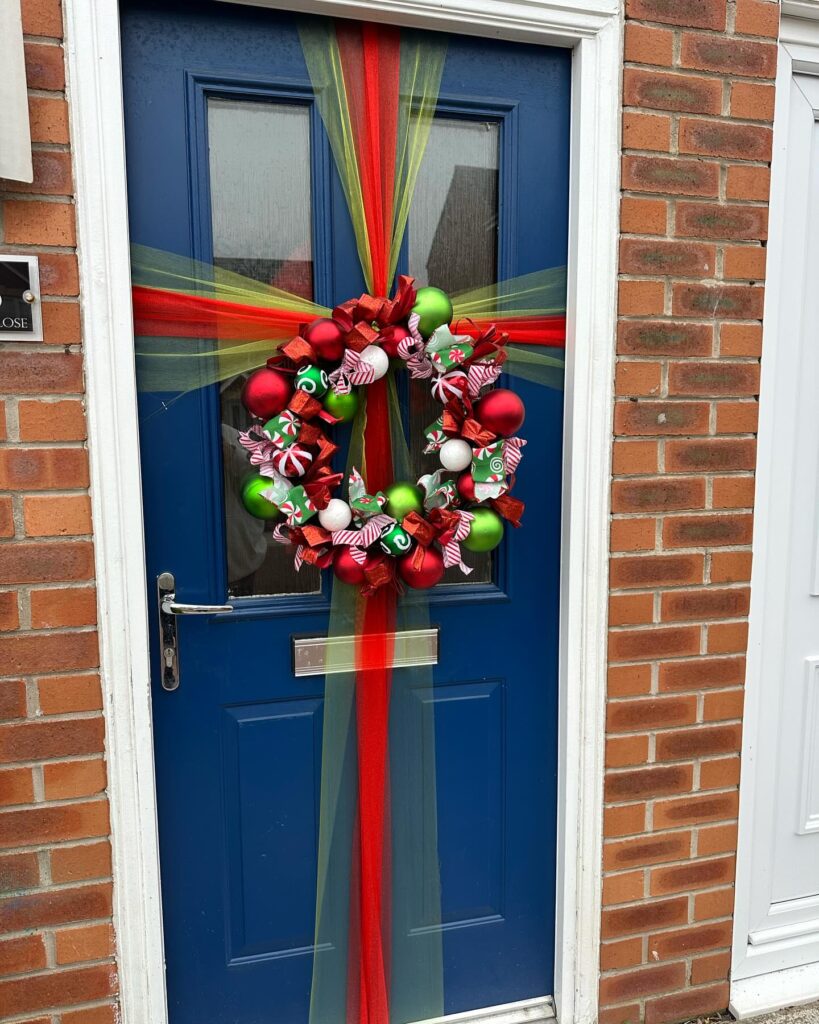
Materials Needed
-
Wide red tulle ribbon
-
Wide lime green tulle ribbon
-
Ornaments wreath (red, lime green, white, candy patterns)
Step-by-Step Instructions
Lay the Green Base: Start with the lime green tulle and make a simple cross over your dark blue door.
Keep one strip vertical and run the other straight across the middle.
Overlay the Red Tulle: Here’s where the colors really start to pop. Take the narrower red tulle and place it right over the center of the green strip for that fun two-tone effect.
Secure the Back: Gently pull the fabric around the edges and secure the ends behind the door with tape or hooks.
A little slack is fine because it keeps the tulle looking soft.
Hang the Wreath: Finally, place your bright ornament wreath right where the two fabric strips meet.
The red, green, and peppermint colors pull everything together and make the whole door feel extra festive.
19. DIY Cardboard Gingerbread Village Door
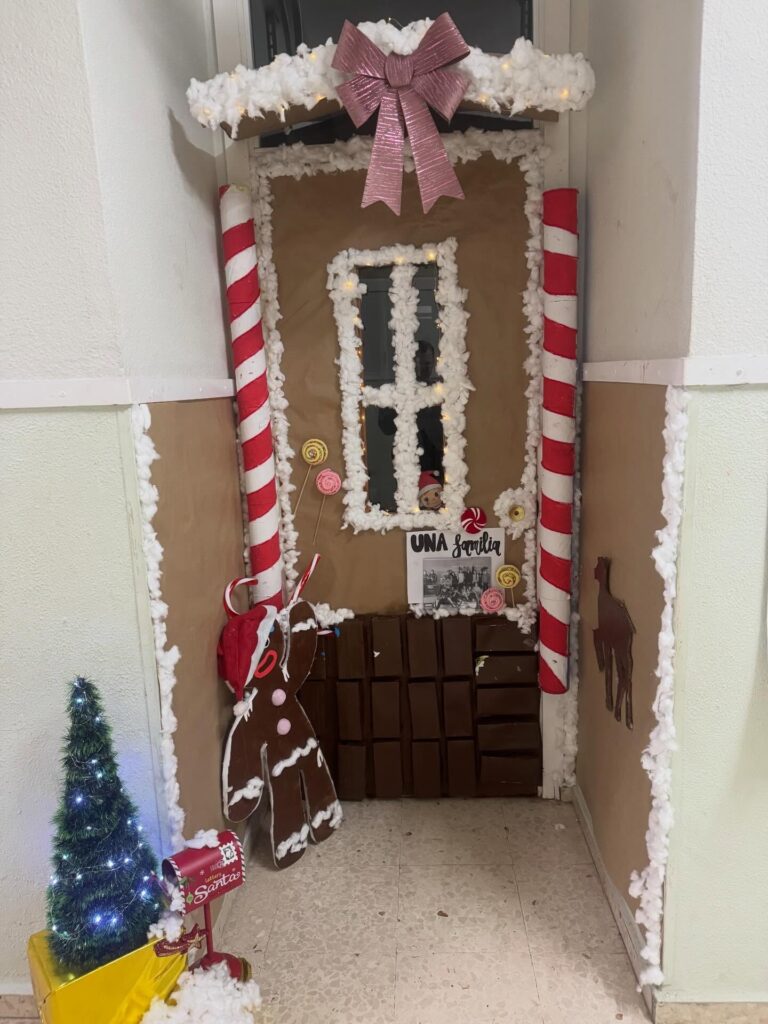
Materials Needed
-
Kraft butcher paper (brown wrapping paper)
-
Cotton wool/cotton balls
-
Cardboard tubes (painted red and white like peppermint sticks)
-
Pink ribbon bow & cardboard gingerbread cutouts
-
Small pre-lit Christmas tree prop
Step-by-Step Instructions
Cover the Background: Give your door a quick gingerbread makeover with brown kraft paper.
Once it is covered, you already have that warm cookie-colored base ready for decorating.
Add the Icing Details: This part is actually pretty simple. Use fluffy cotton wool around the door frame, window sill, and edges to create the look of soft white icing.
Mount the Peppermint Pillars: Now bring in the striped paper tubes and place one on each side of the doorway.
The red and white stripes make the whole entrance feel like a giant gingerbread house.
Decorate the Base: Add the cardboard gingerbread figure, a small glowing tree, and the red “Santa’s Mailbox” near the bottom.
I think these little extras make the scene feel much more cheerful and complete.
20. Vintage Overhead Evergreen & Nutcracker Swag
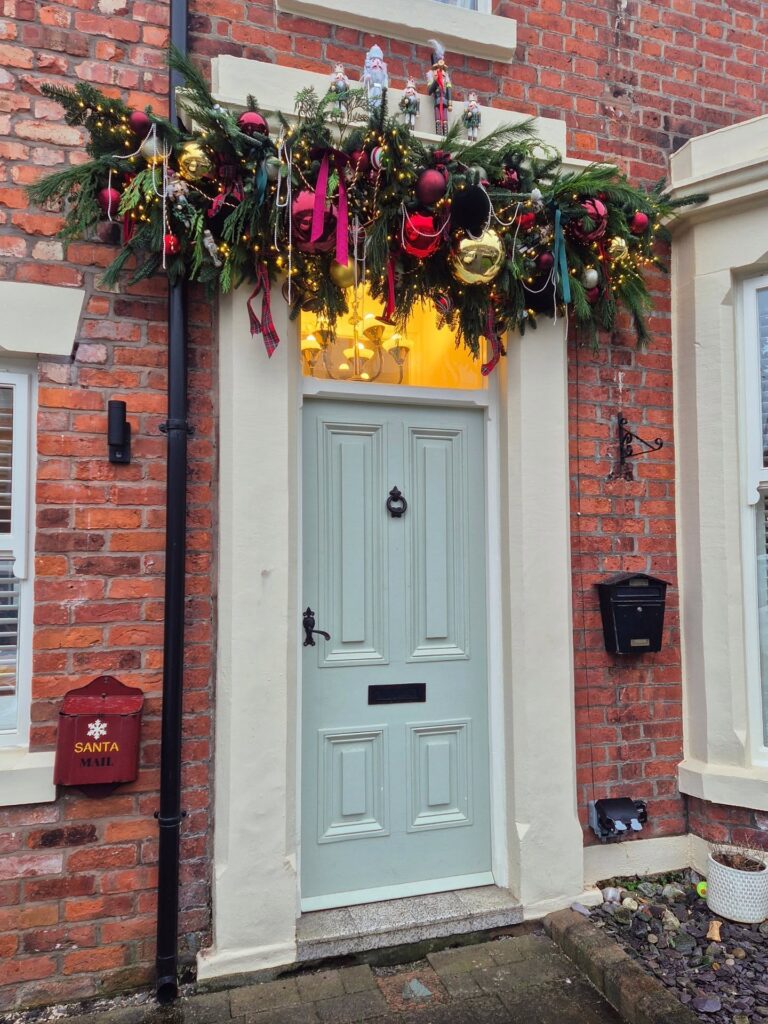
Materials Needed
-
Dense pine lintel garland with fairy lights
-
Deep burgundy, gold, and green ornaments
-
Silver bead strands & burgundy ribbons
-
Miniature nutcracker figurines
-
Vintage red mailbox prop
Step-by-Step Instructions
Mount the Overhead Garland: Get the pre-lit pine garland up across the top beam first.
Let the branches stay a little loose because that makes the entrance feel fuller and more natural.
Nest the Nutcrackers: Those little wooden nutcrackers are such a fun detail.
Tuck them along the top of the greenery and secure them with wire so they do not move around.
Layer the Rich Ornaments: Bring in burgundy, deep green, and gold baubles and mix them throughout the branches.
A few silver bead strands hanging down can add just the right amount of sparkle.
Add the Side Accent: Finish things off with the red “Santa Mail” box beside the brick wall.
I think this gives the whole setup that cozy, old-fashioned Christmas feeling we all love.
Also check out 21 Christian Mom Habits You’ll Wish You Started Sooner.
21. Preppy Tartan & Teddy Bear Garland Arch
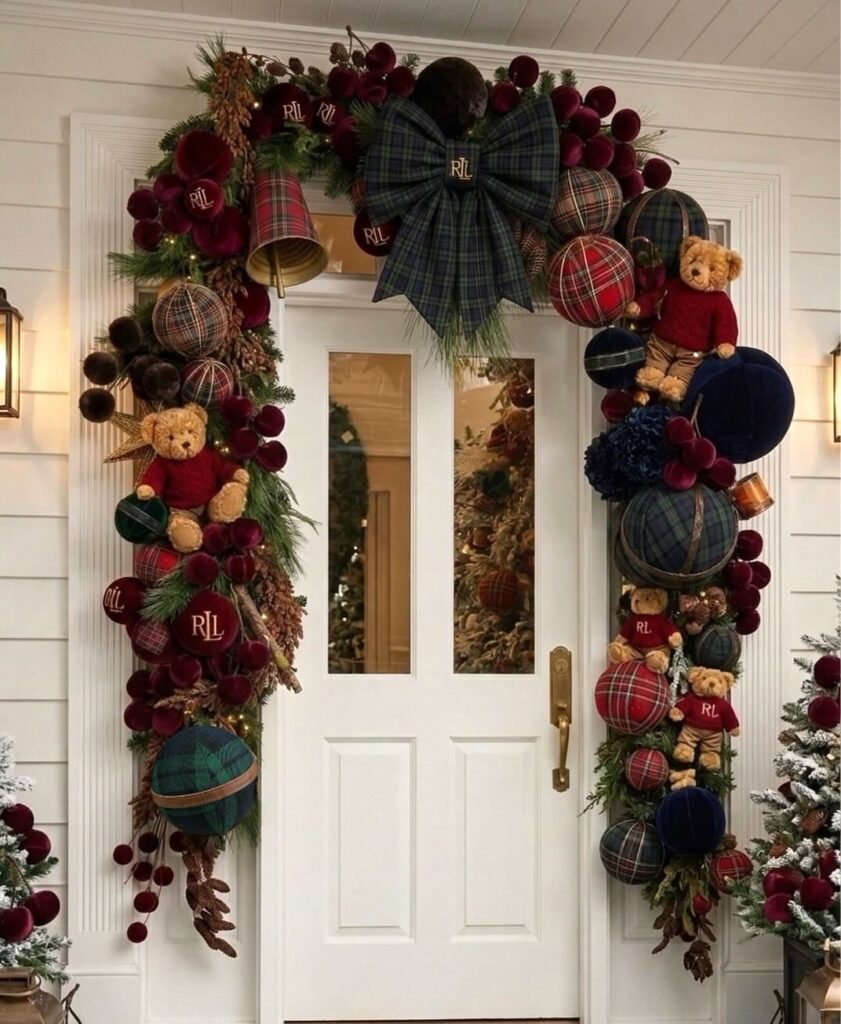
Materials Needed
-
Plaid tartan ribbon bow (dark green and navy)
-
Fabric-wrapped tartan and velvet ornament balls
-
Dressed teddy bear plushies
-
Large brass bell props
-
Pinecone picks and deep red berry clusters
Step-by-Step Instructions
Anchor the Top Bow: Start with your pine garland around the doorway, then add the big tartan bow right at the top center.
Give it a little fluff so those loops look nice and full.
Add the Vintage Bells: Hang the two brass bells just below the bow.
That warm gold color looks so pretty against the greenery and gives the entrance a sweet vintage feel.
Tuck in the Teddy Bears: Now tuck the dressed teddy bears into different spots along the garland and secure them well so they stay sitting nicely among the branches.
Fill with Plaid Baubles: Bring in the tartan and dark velvet ornaments, then add pinecones and deep red berries wherever you see an empty spot.
Trust me, all those cozy textures make the doorway feel extra special.
22. Colorful Kid-Friendly Craft Garland & Wreath
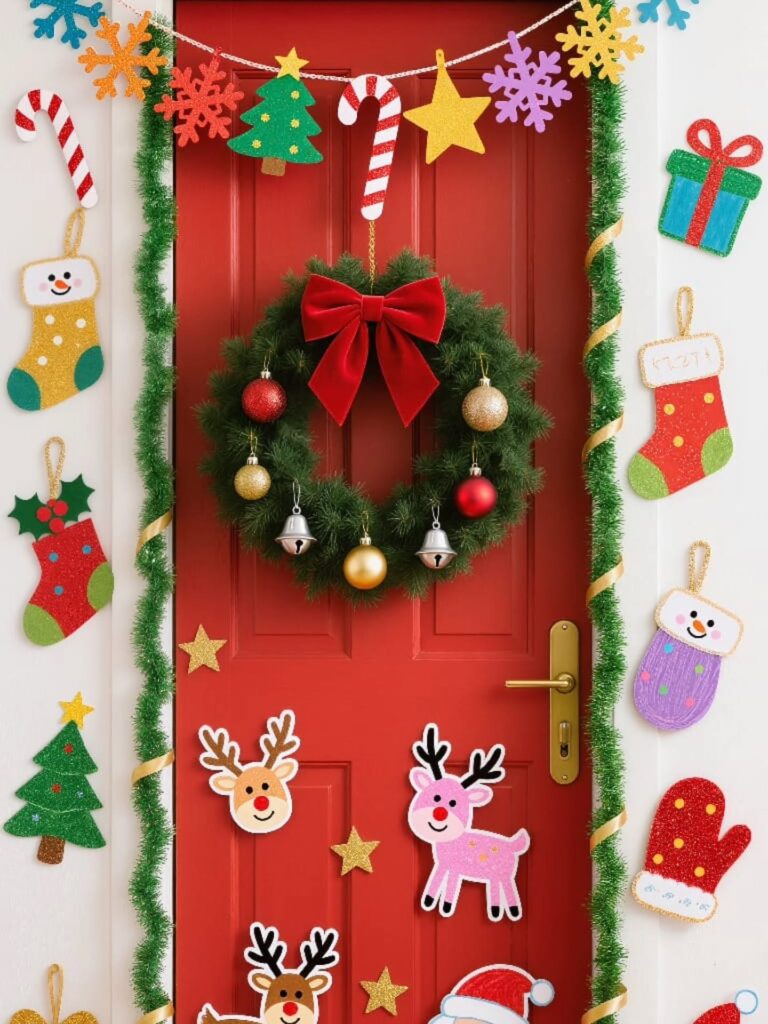
Materials Needed
-
Thin green tinsel garland with gold ribbon trim
-
Simple evergreen wreath with red velvet bow
-
Cardstock craft cutouts (snowflakes, stockings, reindeer, trees, mittens)
-
Gold ribbon or string
Step-by-Step Instructions
Frame with Tinsel: Start by wrapping thin green tinsel loosely around your door frame.
Add a little gold ribbon through it so the greenery has some extra sparkle without looking too busy.
Hang the Craft Banner: A colorful paper banner can make the top of the doorway feel much more cheerful.
String up snowflakes, candy canes, and stars, then let them hang naturally across the frame.
Center the Wreath: Place a simple green wreath right in the middle of the door.
A few red and gold baubles and one pretty red bow are enough to give it that classic Christmas touch.
Stick On the Paper Crafts: Finally add glittery stockings, mittens, Christmas trees, and reindeer around the door and nearby wall for a playful homemade feel.
And that’s it for this guide.
I hope these Christmas front door decor ideas gave you plenty of inspiration for decorating your own entrance.
FAQs
1. How do I hang heavy garlands without damaging my door trim?
A. I’d recommend outdoor-rated Command hooks or over-the-door hangers. For heavier greenery, zip ties and tension rods can also work without leaving scratches.
2. How can I protect my outdoor Christmas decorations from bad weather?
A. Bad weather can ruin decorations quickly, so I usually choose weather-resistant pieces, seal paper crafts, and weigh down anything that could blow away.
3. What is the best way to decorate a front door on a budget?
A. Honestly, you do not need expensive decor. Try tulle ribbons, paper snowmen, or cardboard gingerbread props for a festive look without spending much.
4. When is the best time to set up front door Christmas decor?
A. Late November is usually a great time to start decorating. If you are using fresh pine or berry garlands, wait until early December so they stay beautiful longer.
Final Thoughts
Thank you so much for reading until the end.
Also, please share this guide with your friends and family. Your one share really encourages me to keep writing more guides.
If you have a favorite idea from this list, feel free to share it in the comments below.
See you soon with another guide.